
Using the Configurator in FootID Pro, Part 8
-

We continue our journey through a step by step review of the various options available for our clients in customizing their patients’ custom foot orthotics. Lastly, we left off with a fairly detailed discussion of the use of forefoot posting, which, in my opinion, is a crucial element to gaining successful outcomes in your biomechanics cases and worthy of your further review.
This week, we will be more nuanced, describing and reviewing several options in rearfoot posting, that are used on occasion in special situations, but important to keep in mind when confronted with certain conditions that occur with somewhat less frequency. To find our current location in thei tutorial,, open the FootID Pro application on your Iphone or computer, you may select a patient if you wish, or skip this part and go to the configurator directly, choose an orthotic type, go to the fourth column, “Posting” and scroll down to “Heel Lift”.
The heel lift is defined as an extrinsic elevation of the orthotic heel, inferior to the frame and rearfoot posting. It is usually composed of rigid EVA similar to the rearfoot post material. It is available in increments from 1 mm up to 6 mm simply added only under the rearfoot post, and from 10 mm up to 26 mm when it will be full length under the entire frame tapering to zero thickness under the distal edge of the frame.
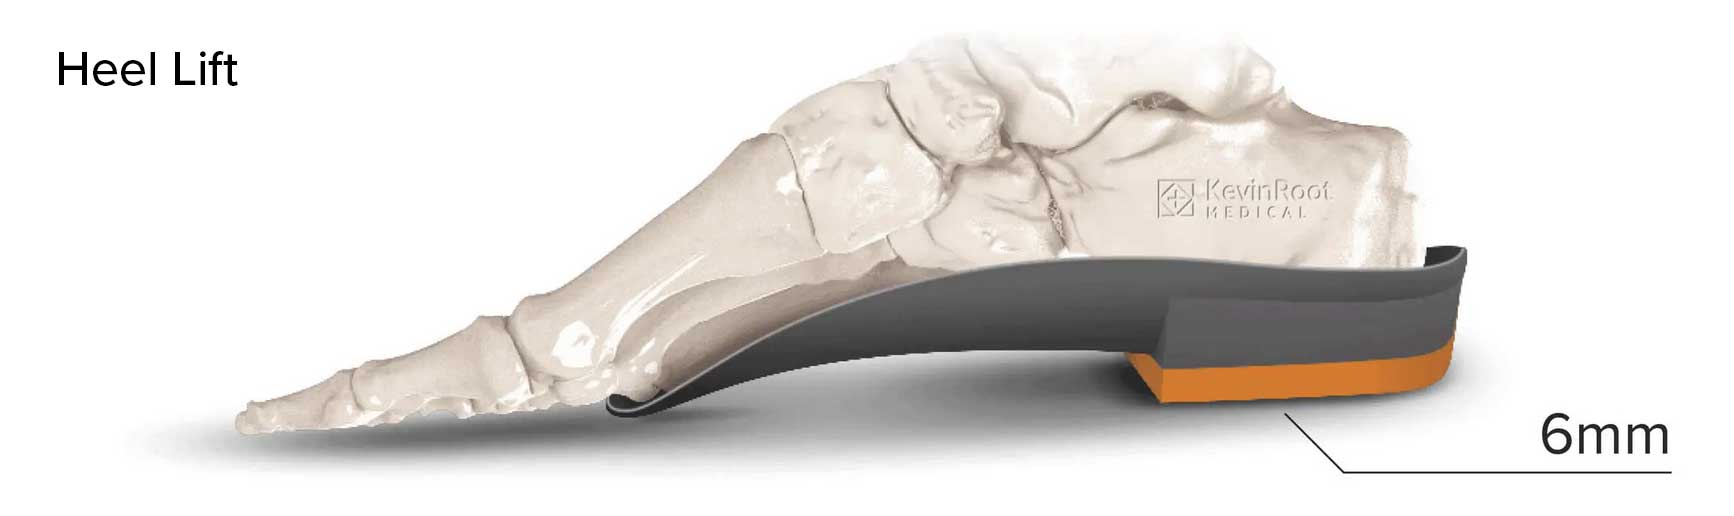
Similar to other fields within the app, you may select the chain link icon located at the top middle of the field if you wish to designate a heel lift unilaterally, otherwise you will have bilateral and symmetrical heel lifts. There is generally no default value in this field except for the Achilles Tendinitis model.
The next field we encounter is “Heel Skive” sometimes known as a “Kirby Skive”. A heel skive can be either a medial skive or a lateral skive. It is an alteration in the shape of the heel cup where the concave curvature is somewhat flattened or raised to more of a straight slanted upward slope, intended to prevent motion of the heel in that direction on the frontal plane. So, to control eversion of the heel in a case of overpronation, you want to select a medial skive. Conversely, if you wish to enhance your control of lateral instability with an overly inverted heel position you might add a lateral heel skive to your prescription. In essence, you are creating either a varus or valgus wedge without changing the angle of the rearfoot posting. Heel skives can be combined with varus and valgus rear foot posting, as well as medial and lateral flanges to enhance corrections. It is advised to not use the heel skive with intrinsic rearfoot posting. Heel skives can be 2, 4, or 6 mm thick and are incorporated into the frame material during design of the positive foot model. They can also be unilateral or bilateral. For those of you who like to tweak your patient’s orthotics on occasion, a heel skive can be added after the fact using a firm material such as cork, EVA or felt and applied to the upper surface of the heel cup either on the medial or lateral side.
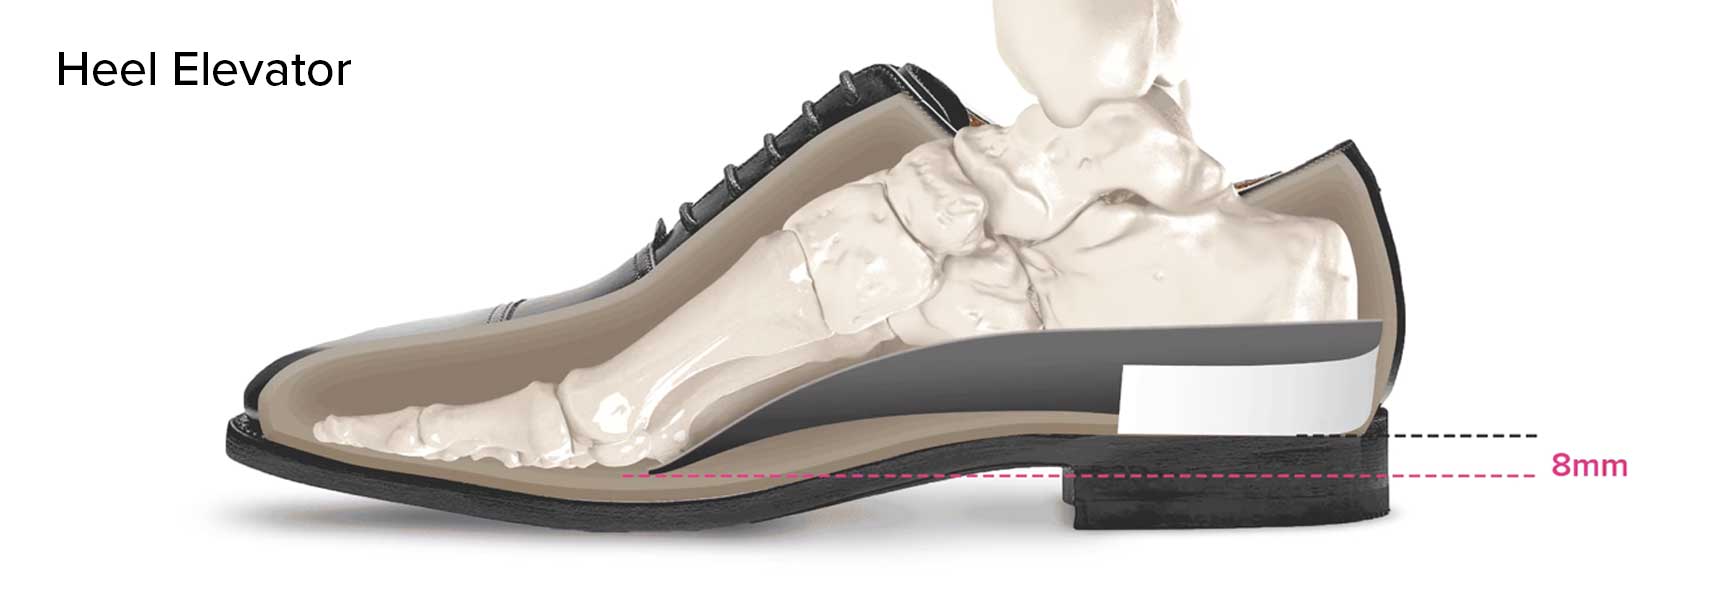
The next field we encounter is “Heel Elevator”. It differs from a heel lift, in so much it is tapered to be higher posteriorly than anteriorly, thus changing the pitch of the plantar of the rearfoot post in the sagittal plane. The thicker the elevator, the higher the rear of the post. The options in height are 4, 8 and 12 mm and can be either unilateral or bilateral. It is handy on occasions where you are dealing with a shoe or boot with a significant heel to toe drop. It can also be useful in cases of “pump bump”, Haglund’s Deformity, Achilles tendon pathology or other posterior tendon issues.
“Proximal Post Grind Off” removes the most posterior portion of the rearfoot post. It reduces the lever arm to the posterior of the ankle joint and thereby reduces the force needed by the Tibialis Anterior to decelerate foot plantarflexion at heel strike. It is somewhat akin to a rocker bar under the heel. It is most useful in cases of shin splints, and Anterior Tibial Tendinitis.
“Rearfoot Post Thickness” allows you to vary how high or thick the rear foot post will be, If you wish a slightly lower profile rearfoot post you should select either “Grind into Frame” or "Grind into Frame Max” and the thickness of the rearfoot post will be reduced, but not alter the shape of the heel cup such as with intrinsic rearfoot posts or skives. It also does not modify the correction built into the post, so may be combined with either a valgus or varus rearfoot post of your choosing, either unilaterally or bilaterally.
This concludes the options available for posting your custom foot orthotic devices in the FootID Pro application. However, other highly specialized options may be available to you, if requested. One example is the oblique rearfoot post featured in the Coleman A9 model which is designed to treat the rigid cavus type foot needing additional lateral stability in the rearfoot towards the midfoot. Our next topic will be starting with “Extensions”, the next column in the FootID Pro app.